Coding

Now Shipping: xUnit support for Windows 8 and Windows Phone App 8.1

August 11, 2014 Coding 2 comments , ,

After years of unofficial hacks to get xUnit working for Windows Store apps, I’m happy to announce that xUnit v2 beta 4 ships with official support. As an added bonus, Windows Phone App 8.1 support is included as well.

To use xUnit for Store, you need the latest xUnit.net runner for Visual Studio installed.

Steps to create a Windows 8 Store Unit Test for xUnit:

  1. Install the runner
  2. Create a new Windows Store Unit Test project
  3. In the project references, remove the MSTestFramework reference and delete the UnitTest1.cs sample test
  4. Use NuGet to Install-Package xunit -Pre and install at least version 2.0.0-beta4-build2738
  5. Create your tests
  6. When you compile, you’ll see the tests in the Test Explorer window (make sure to show that window if it’s not visible)

Steps to create a Windows Phone App Unit Test for xUnit:

  1. Install the runner
  2. Create a new Windows Phone App Unit Test project (not Windows Phone 8.1 Silverlight)
  3. In the project references, remove the MSTestFramework reference and delete the UnitTest1.cs sample test
  4. Use NuGet to Install-Package xunit -Pre and install at least version 2.0.0-beta4-build2738
  5. Create your tests
  6. When you compile, you’ll see the tests in the Test Explorer window (make sure to show that window if it’s not visible)

To Do

  • Windows Phone 8 support – technical issues to overcome
  • Project Templates

Limitations

Right now, only Any CPU/x86 is supported by the VS Runner due to limitations in the VS Runner’s extensibility model. We plan on shipping a device runner, similar to the Xamarin Runner that will enable on-device ARM testing.

I’d like to thank @bradwilson and @jamesnewkirk for their patience and persistence with merging these large pull requests and keeping the release bar so high.

Announce: Ninject for Xamarin (and everything else)

August 4, 2014 Coding 3 comments , , ,

I’m happy to announce Ninject support for Xamarin.iOS and Xamarin.Android. Together with the previous release, which included support for Universal Apps, Ninject now supports every major platform in a single Portable.Ninject NuGet package.

Not being enough to simply support each platform, the Portable.Ninject package includes a Portable Class Library (PCL) reference assembly so you can reference Ninject in your PCL’s. Just make sure to also add the NuGet reference to your main application so the “real” bits get used instead of the reference assemblies. This means it’s easy to have NinjectModule‘s in your portable code.

For more documentation, please visit the Dojo or the Wiki.

To get started

  1. Add the Portable.Ninject package to your project.
  2. If your project is a PCL, also add the package to your main app.
  3. Somewhere in your main app, usually your App class (Windows), AppDelegate (iOS), or Application class (Android), create the Kernel and load your types/modules.

Limitations

This package just has the core Ninject functionality. Much of Ninject’s power comes from its extensions, including Convention Based Binding and Factory. These extensions have not yet been forked and updated to work with Portable.Ninject, but they shouldn’t be hard to do. Please drop a note to let me know which extensions you’d like to see brought over.

Contributing

Contributions are very much welcome! Please clone/fork my repo and use the bait-switch branch as your starting point. The solution contains unit test projects for all platforms; to run the xUnit ones for Wpa81 or Win8, you’ll need the latest xUnit runner for Visual Studio extension installed too.

External Auth in ASP.Net MVC/SPA/Web API apps

July 31, 2014 Coding 3 comments ,

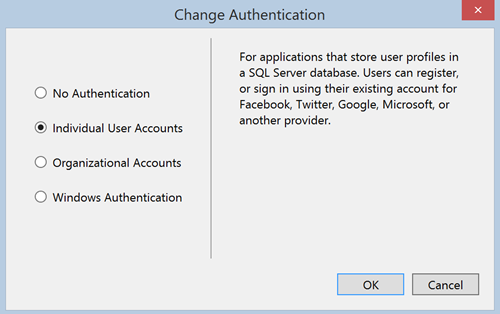
Out of the box, Visual Studio 2013 comes with a number of templates for ASP.Net to cover most scenarios. The issue is that if you want registered users, you have a choice between Individual User Accounts, Organizational Accounts or Windows Authentication.

VS 2013 ASP.Net Options

While “Individual User Accounts” sounds like the only option for apps that aren’t using Azure AD or Windows Auth, the trouble is that it brings in all of ASP.Net Identity, which includes a local user database. If you look at the description above, it seems like this is the option to use for external/social logins, but as we’ll discuss shortly, it’s a red herring.

There are a few reasons why it’s not a good idea to mix your user database with your main app:

  • Single Responsibility Principle. This is the “S” in SOLID, and it applies to your application/service as a whole, not just your classes. Your application should be great at what it does. Your services should be granular and each do a single thing. Your app is the best thing since sliced bread. What it doesn’t need, is to manage users.
  • Security is hard. If you look at the template code generated by the ASP.Net wizards for “Individual User Accounts,” you’ll see tons of code in the AccountController class. Go ahead, take a look, I’ll wait. Back yet? That code is now on you to understand and work with as after creation, it’s no longer a library. As you go about adjusting the templates, and views, you need to make sure you don’t accidentally introduce any issues. And you will need to be touching that code as the templates are not complete; they’re a getting-started point.
  • Higher Risk. Even though the password field in ASP.Net Identity is salted and hashed, there’s still a lot of juicy information in your users table that a 1337 h@x0r would love to get their hands on. You don’t want that 3am phone call.

Now that you’re hopefully thoroughly convinced that you do not want to implement your own authentication, you’re wondering what can you do now? The answer is to use an external authentication provider. Facebook is one, Microsoft Account another, and Google yet another. There’s no shortage of external authentication providers these days. If you’re thinking that “Individual User Accounts” with ASP.Net Identity does this for you (it’s in the description and template code!), don’t lose sight of the fact that it’s really creating new identities in your app and simply linking external logins. See Brock Allen’s detailed description on how it all works. It’s the same core issue where your app is now managing identities.

Returning to that initial ASP.Net Authentication options dialog, there’s one option that’s conspicuously absent: External Identity Provider. This is one option that really needs to be present in the dialog—a set of templates that are geared around validating external claims that aren’t part of Azure AD.

For Web API apps validating a Bearer token, this comes down to a single line of code (with Thinktecture’s OWIN component):

app.UseJsonWebToken({issuerId}, {audience}, {appSecret});

With that one line, your Web API can rely on true external security.

To be clear, relying an an external provider does not mean that you need to give up the idea of having “local users,” or multiple social logins like Facebook either. If you don’t want to be tied to a single provider, you can use a service like Auth0 or an configurable identity app like Identity Server. Either of those options provides an appropriate architectural separation of concerns and lets the experts handle the authentication. Your app becomes a Relying Party to the external authentication service, receiving, and validating, a set of claims (such as an email address or unique user id in their system).

The key difference between ASP.Net Identity’s assumptions and templates and using an external provider is who owns the claims. ASP.Net Identity translates external claims into its own identity system and issues its own new set of claims and tokens. My recommendation is that this extra layer is unnecessary and your application should use externally provided claims primarily.

There’s one area that I haven’t covered yet: what if you have your Web API and MVC content (even a SPA) in the same site? You’d like your login mechanism to work for both your web UI and your API. This is an area that has caused much confusion in current incarnations as Web API and MVC each do authentication a bit differently. For web browsers, you need some form of cookie auth while still having bearer tokens available for your API. This is exactly the situation I was in where I fell into the ASP.Net Identity trap. I’ll talk more about what happened and how I solved it next time.

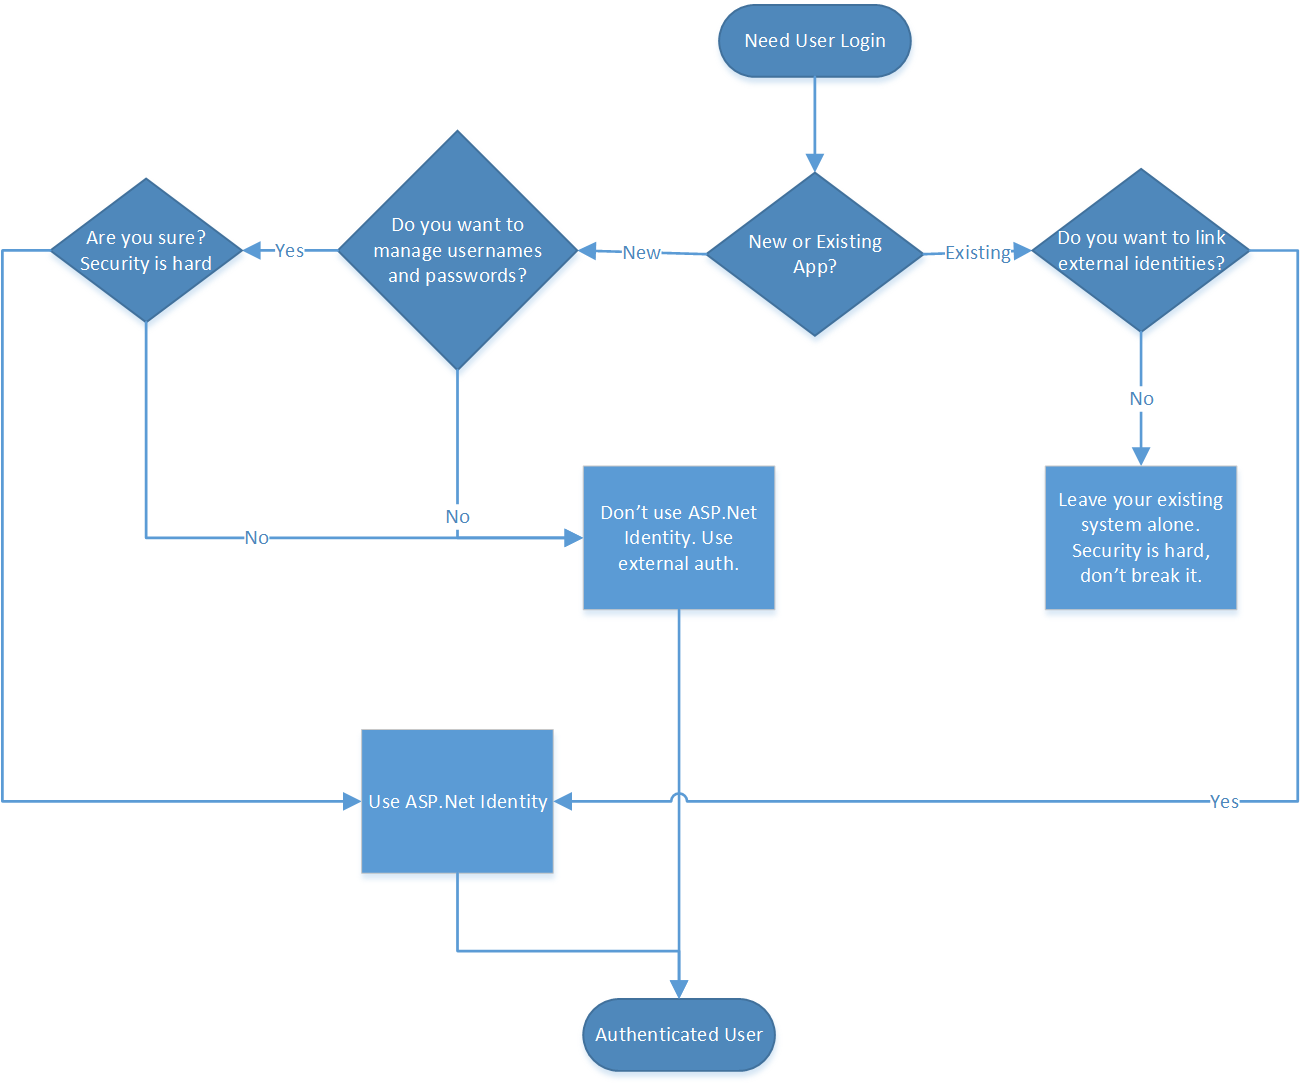
To sum up, if you’re not sure whether to use ASP.Net Identity, this flow chat might help:

Special thanks to Barry Dorrans for reviewing this content prior to release.

Fluent Assertions 3.1 for Xamarin

July 29, 2014 Coding No comments ,

I’m happy to announce that Dennis Doomen and I have coordinated to sim-ship Xamarin support for Fluent Assertions 3.1 along with the main Fluent Assertions release. This release works well with xUnit for Xamarin or Xamarin’s existing nUnit/nUnitLite.

You can find the main release notes here.

To use Fluent Assertions with your Xamarin Unit Test project, just add a NuGet reference to FluentAssertions.Xamarin.

Happy testing!

Getting Started with xUnit for Xamarin

July 10, 2014 Coding 3 comments , , ,

xUnit.net 2.0 supports both Portable Class Library (PCL) and platform specific projects for iOS and Android.
Unit tests for Xamarin have two main components, which may reside in the same assembly. This post will show you how to get started.

Requirements

  • Xamarin Studio 5.0
  • Visual Studio 2013 Update 2 with the latest Xamarin for Visual Studio

Architecture

Xamarin support consists of two logical components, which may be in the same assembly or may be split:
1. Assemblies containing tests. This may be either a Xamarin project or a PCL. This assembly contains your test classes.
2. App for running tests on a device or simulator. This bootstraps the tests. It’s important that you set any permissions, such as internet access, geo locations, notifications, etc, if your app requires it.

The Goods

For simplicity here, we’ll put both pieces in the same project, but you can also put your tests in a separate library and reference it in your runner app. We’ll use Android as an example, but it’s exactly the same for iOS.

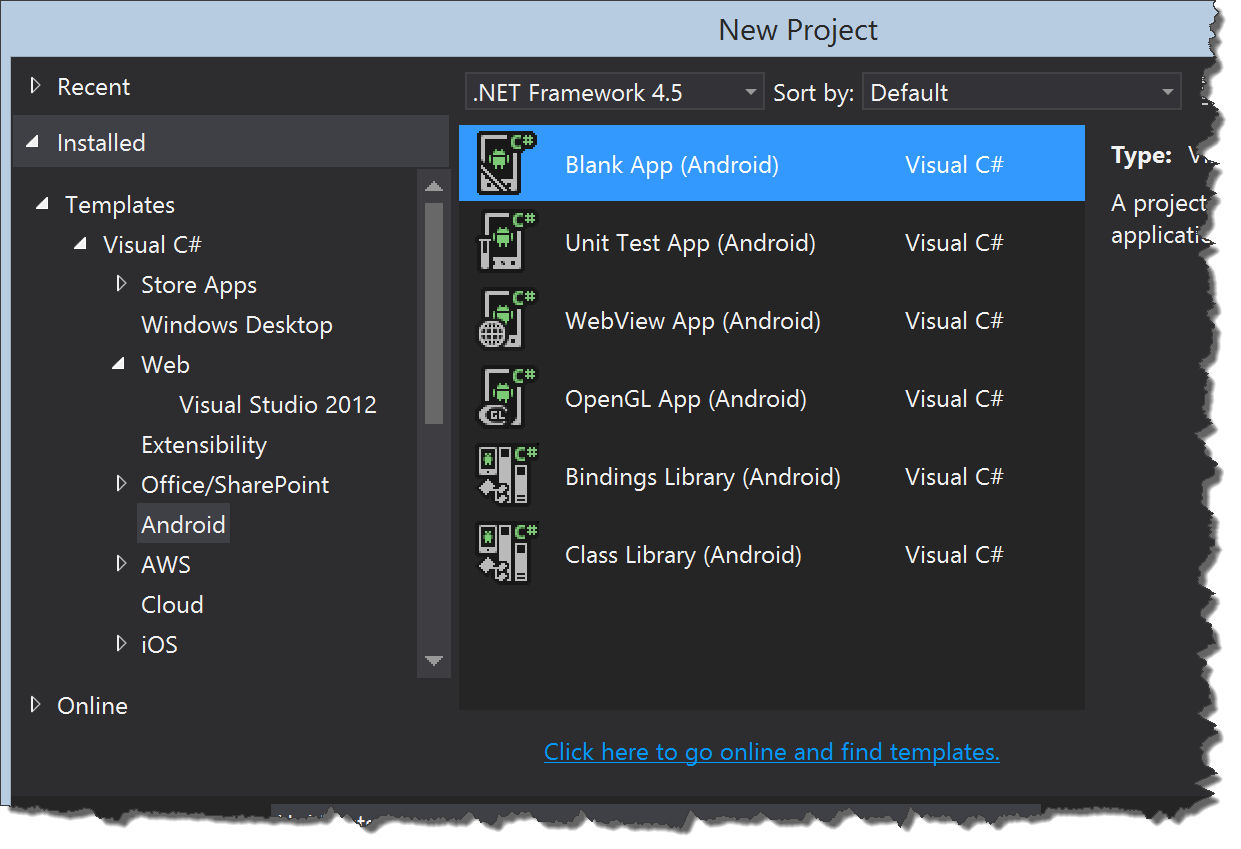
  1. Create a new blank Android project:

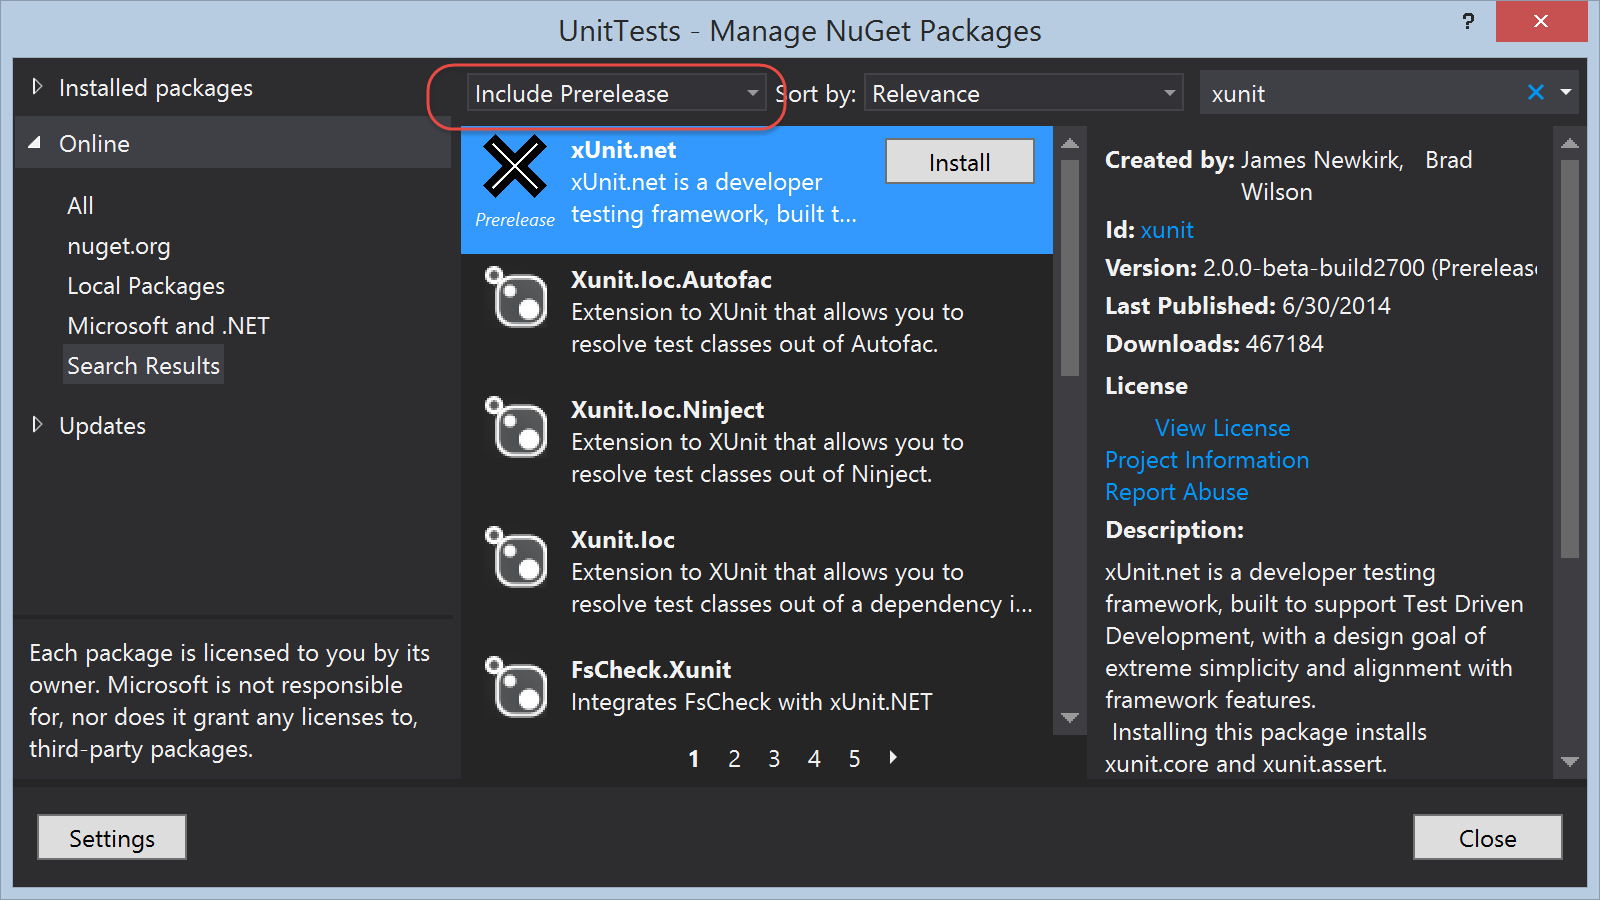
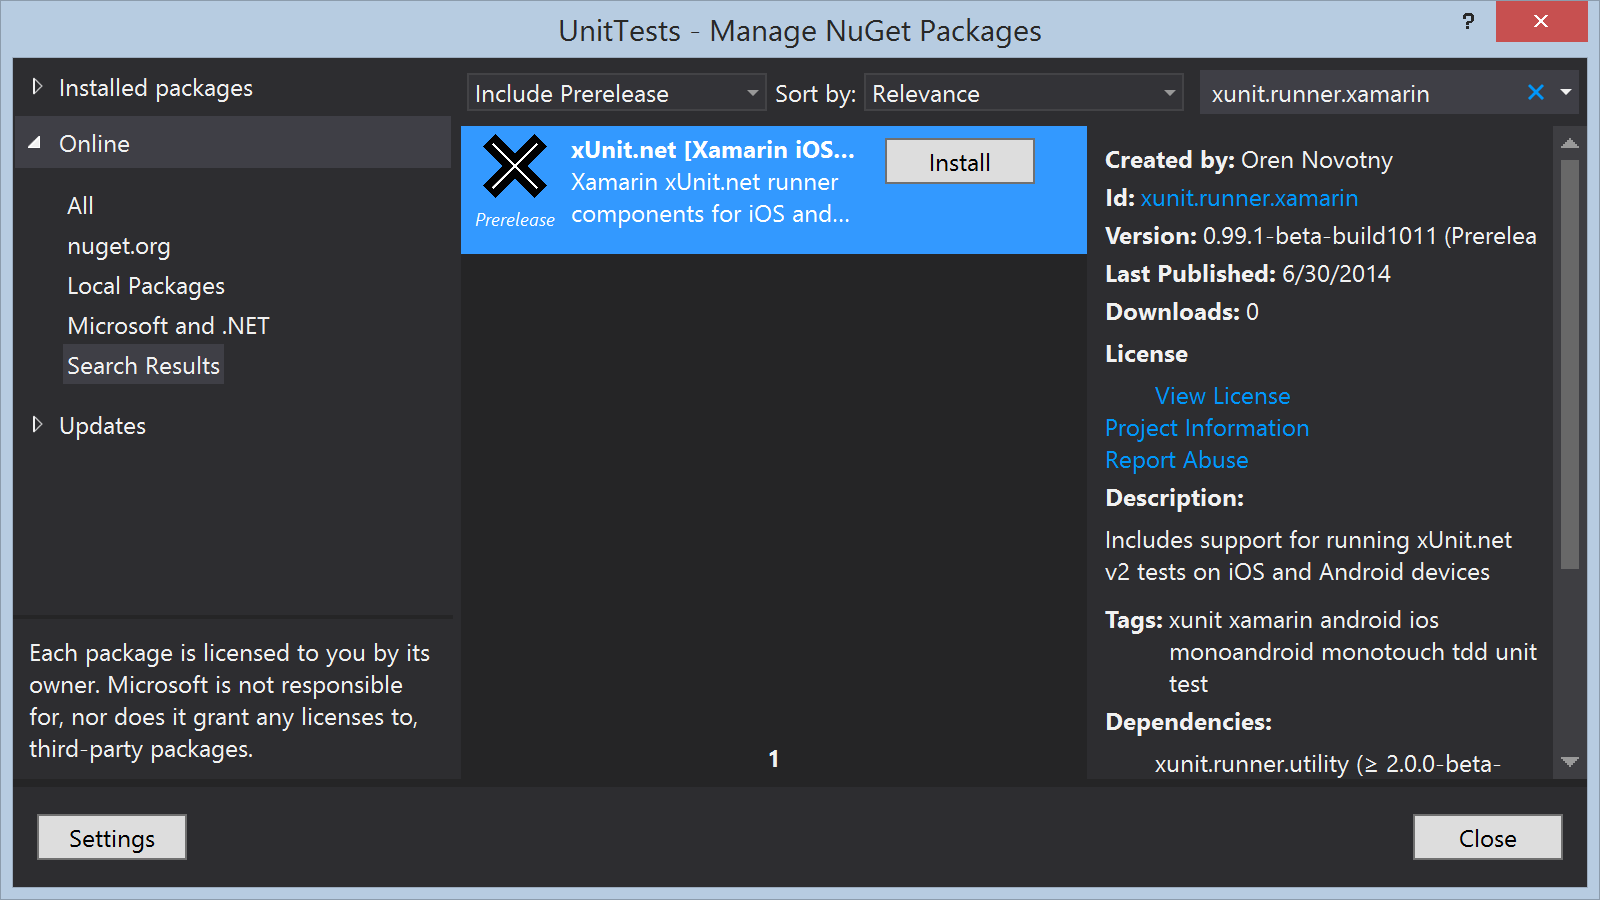
  2. Add the NuGet references for xUnit and xunit.runner.xamarin. Make sure the Prerelease option is enabled as xUnit 2.0 is still in beta.


  3. After installing the package, you’ll see a file MainActivity.cs.txt (on Android or AppDelegate.cs.txt for iOS). Copy/paste the contents of that file into your real MainActivity.cs file. Congratulations, your runner app is now ready, you just need to add some tests!

  4. Create a new test class and start creating your tests. For more info on xUnit, check out the Getting Started page.

  5. When you’re ready to run your tests, just debug/run your app as you would any other. You can use a device or simulator.

Current status on the Runners

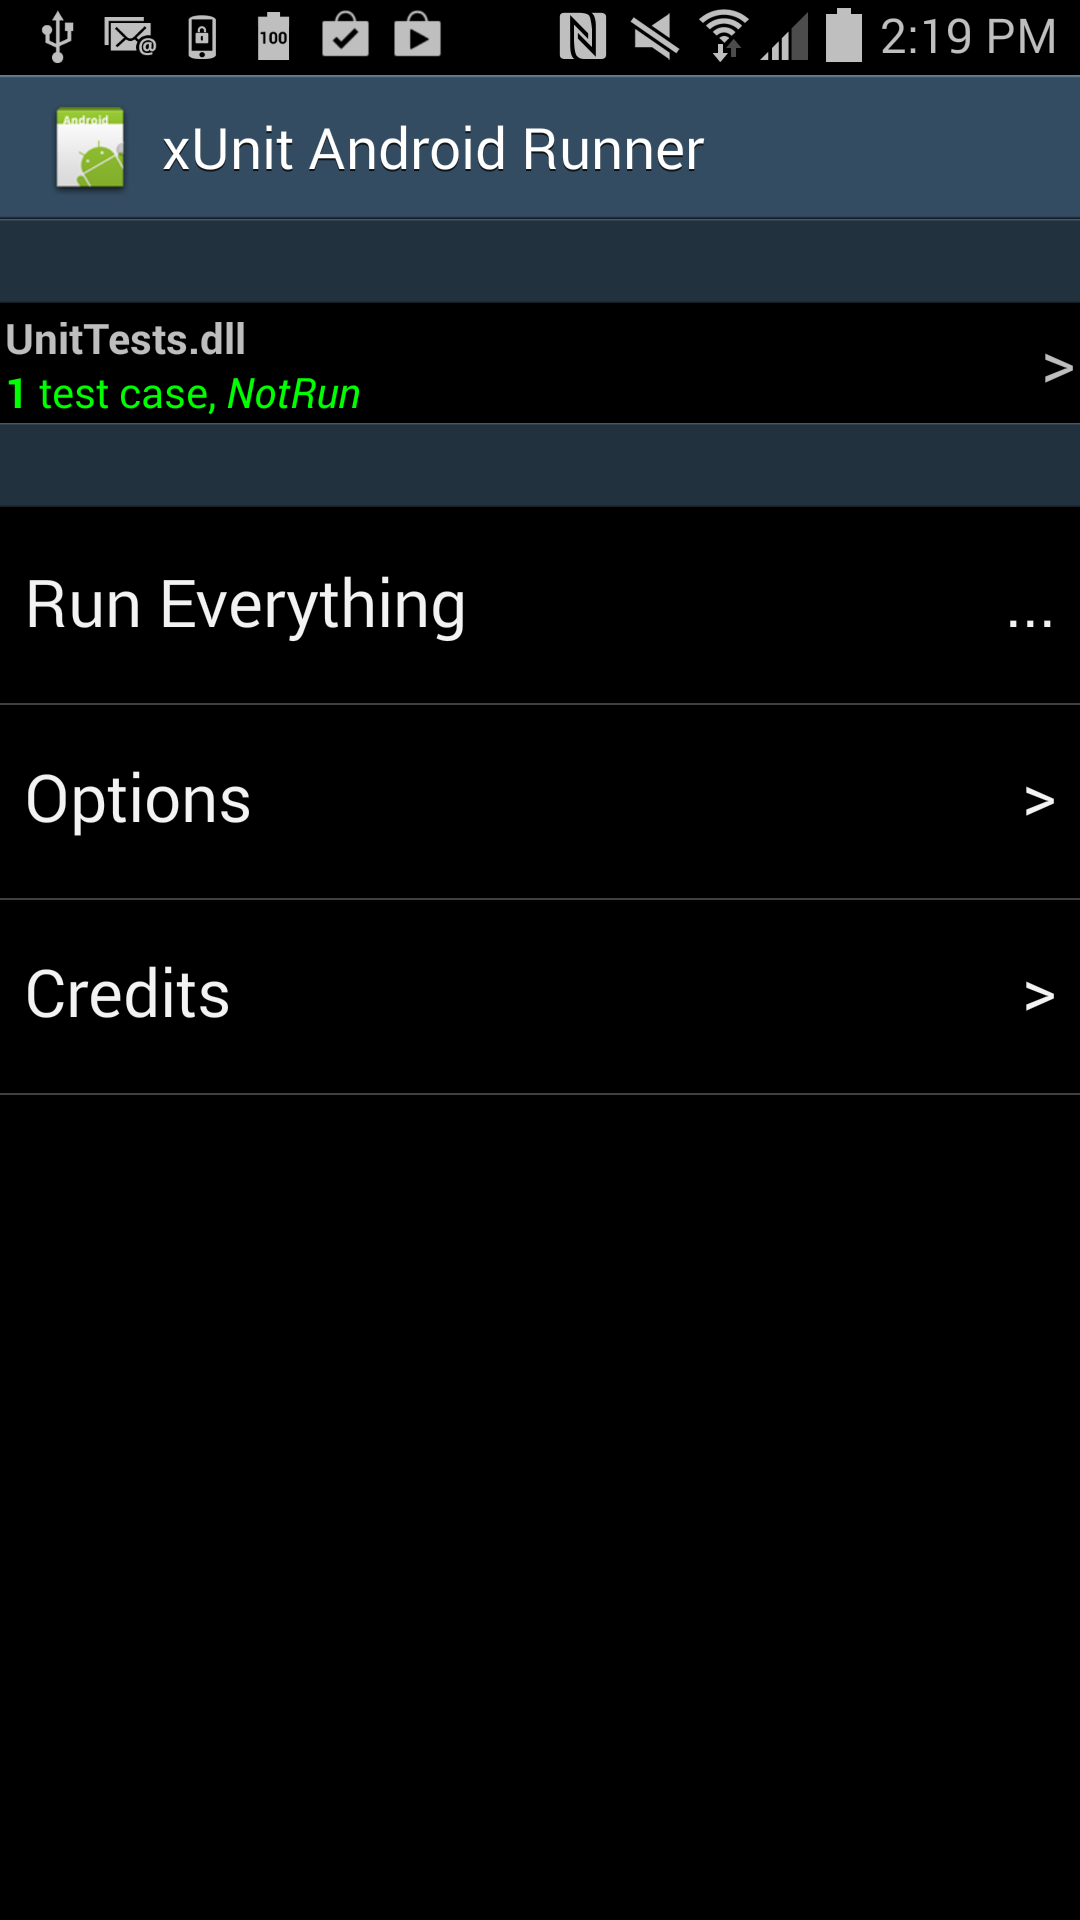
The runners today are functional, but they’re not pretty. The iOS and Android runners do share quite a bit of code, but the UI is duplicated as it was created before Xamarin.Forms was announced. There’s a ton of room for improvement and I welcome any help in the form of a Pull Request. The code is all on GitHub here.

WinRTTimeZones now on NuGet

October 16, 2012 Coding No comments , , ,

In my previous post, I described how to convert Time Zones in WinRT/Store apps. I’ve gone ahead and released a Windows Runtime component to NuGet that provides basic time zone conversion.

Use the package “WinRTTimeZones” and if you want the source, it’s on GitHub.

Converting TimeZones in Store/WinRT apps

October 15, 2012 Coding No comments , , ,

For anyone who’s tried to convert a DateTime/DateTimeOffset to another time zone in a Windows Store style app, I’ve put together a helper class that uses some of the Win32 APIs that are allowed in Store apps.

UPDATE 10/16: I’ve created a NuGet package with a generic version, please use that instead as it already has significant bug fixes.

In the code below, I’m converting all times to be Eastern time, but it can be easily adapted more generically. I’m calling the Win32 functions that take changes in daylight time into account, so it should be accurate for any supplied date.

The TimeZoneKeyNames are in the registry in the following location:

HKEY_LOCAL_MACHINE
   SOFTWARE
      Microsoft
         Windows NT
            CurrentVersion
               Time Zones
                  time_zone_name
                     Dynamic DST

The code is based on DateTimeOffset’s as DateTime isn’t allowed as a public type in a Windows Runtime component. Using this code, you can display a list of system time zones. You can also pass in a current DateTimeOffset or DateTime (make sure you have it correctly marked as either UTC or Local) and convert it to a DateTimeOffset in another timezone.

Hopefully this will help someone or can be included as part of a bigger utility library.

Using xUnit to test Metro Style Applications

July 4, 2012 Coding No comments ,

Many people would like to use xUnit to test their Metro-style applications. While this isn’t yet currently possible with the main xUnit binaries, I have updated the code to get it working on WinRT. Without getting into the nitty-gritty, I’ve created a Project Template that’ll make it a snap to get started.

You’ll need two things

  1. The xUnit.net runner for Visual Studio 2012. This lets the Unit Test Explorer recognize and run xUnit tests.
  2. The xUnit Test Library Template for Windows Store apps. With this, you can easily create a unit test project to test your metro style applications and libraries.
  3. I haven’t yet created a template installer VSIX for the Code Gallery, but that’s coming soon – need to resolve a few issues with it first.For now, just extract the zip file into your Documents\Visual Studio 2012\Templates directory. It’ll put a file into the Documents\Visual Studio 2012\Templates\ProjectTemplates\Visual C#\Windows Metro style directory.

    UPDATE (8/29/2012): For the RTM version, I’ve now created a VSIX installer for the template, so just grab it off of the gallery and you’ll be good to go.

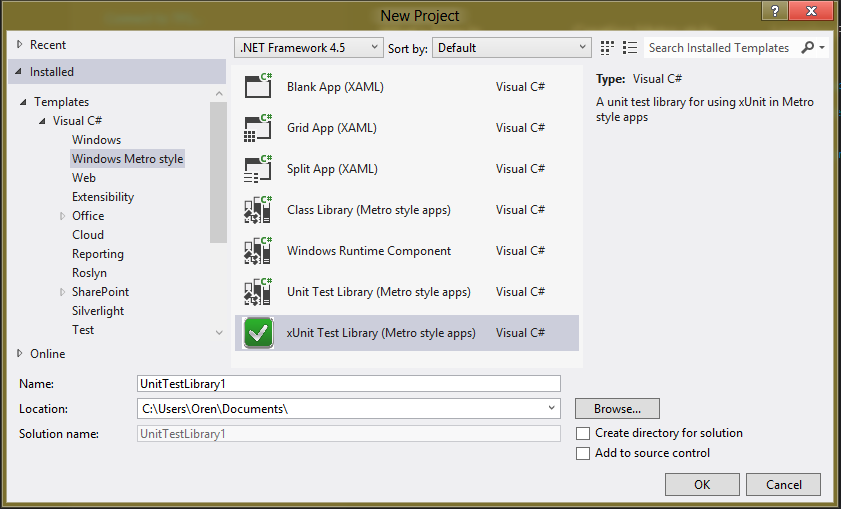
If you have Visual Studio running, you’ll have to restart it to pickup the new template; once you do, you’ll see the following in the File –> New Project dialog:

That’s all folks, just add a reference to the libraries you want to test and get started. There’s a passing test already in the template so you can verify that it works for you.

Enjoy!

How To Use Extension SDKs per-project

March 24, 2012 Coding 3 comments , ,

Background

Extension SDKs are one of the new ways of distributing components for Metro-style applications. An Extension SDK is similar in concept to a regular assembly reference, but is instead a rich collection of files to cover various configurations and design time scenarios. Beyond a simple file reference, Extension SDKs provide the following:

  • References folder (binaries to be referenced by the project)
  • Redist folder (additional files that are needed for runtime or debugging and should be packaged as part of the application)
  • DesignTime folder (files used for design-time)
  • Configuration (debug, release, CommonConfiguration – have different files for different build types)
  • Architecture (x86, x86, ARM – necessary if referencing native code)
  • Locale (localized files)


The full details on how to create an Extension SDK are in the MSDN page linked above, but one thing to note is that by default, VS and MSBuild will only look for Extension SDKs in the following locations:

  • \Program Files\Microsoft SDKs\Windows\v8.0\ExtensionSDKs
  • \Users\[username]\AppData\Local\Microsoft SDKs\Windows\v8.0\ExtensionSDKs
  • HKLM\Software\Microsoft\Microsoft SDKs\Windows\v8.0\ExtensionSDKs\[SDKName]\[SDKVersion]\@default = [SDK root]


Naturally, a question arises around storing an Extension SDK alongside their source code instead of in a separate location. There are a few reasons why some people want to do this:

  • Traceability – some teams require that all tools and libraries used as part of a build, or referenced by their applications, live in source control so they know exactly what version was used to build an app at any point.
  • No-installation – some teams do not want to have to install, or cannot place, packages on their build servers. The default locations are often off-limits in shared build environments.
  • Versioning across branches – While you can have multiple SDK versions installed, every user who builds the app needs to have the right version already installed.


The solution is to put the libraries in version control in a “libs” directory. NuGet does this for existing libraries in a \packages directory at the solution-level; it does not yet support Extension SDKs. The good news is that both Visual Studio 11 and MSBuild already support defining additional locations for Extension SDK’s by overriding the SDKReferenceDirectoryRoot variable. The key is to add the override after the <Import> element near the end of the csproj/vbproj file like this:

<Import Project="$(MSBuildExtensionsPath)\Microsoft\WindowsXaml\v11.0\Microsoft.Windows.UI.Xaml.CSharp.targets" />
<PropertyGroup>
  <SDKReferenceDirectoryRoot>$(SolutionDir)\libs;$(SDKReferenceDirectoryRoot)</SDKReferenceDirectoryRoot>
</PropertyGroup>


With that in place, you can then put your Extension SDK files alongside your solution:

\libs\Windows\v8.0\ExtensionSDKs\[SDKName]\[SDKVersion]\…

Once there, it will be available in the Visual Studio Add References dialog like any other Extension SDK.

An Example

Let’s walk through an example of how we can use the Bing Maps SDK for Metro style apps (beta) as a per-project SDK instead of being installed in either the user profile or program files locations. Initially, most Extension SDKs are likely going to be distributed as either a VSIX or MSI so they can install into the right location. The easiest approach is to install on one machine and then copy the files into your source tree. Then you can then uninstall the SDK if you’d like.

After downloading the Bing Maps SDK from the gallery, install the VSIX file:
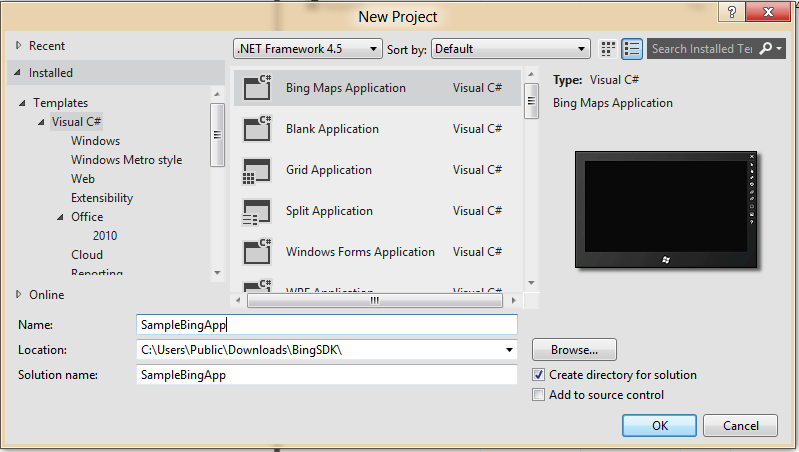
Next, lets create a new Bing Maps Application using the template installed by the VSIX:
Once the project is created, if you expand References in the Solution Explorer, you’ll see that Bing has been added as a reference:
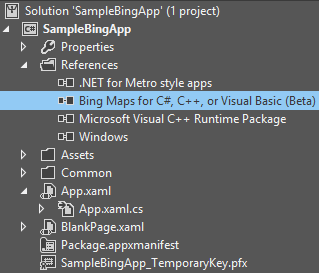
Right-clicking and selecting Properties on the reference will show you that it’s an SDK reference and where the file are located:
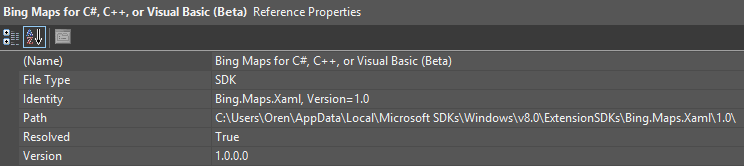
You can see from the Path that Visual Studio (and MSBuild) are reading the file from \Users\[username]\AppData\Local\Microsoft SDKs\Windows\v8.0\ExtensionSDKs.

Now, lets make our changes so we can store those files alongside our solution.

First, in Explorer, navigate to the folder with your solution in it, then create the following directory structure:
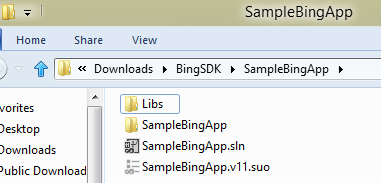
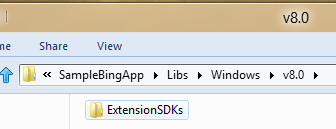
Libs\Windows\v8.0\ExtensionSDKs.

Next, in another Explorer window, go to your local AppData directory in your user profile and navigate to the ExtensionSDKs directory there:
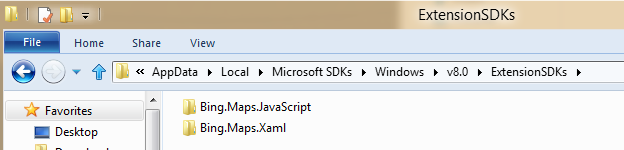
Next, copy the two directories (or just the one you need, either Xaml for Managed code or the other for JavaScript) to the ExtensionSDKs directory you created earlier underneath the solution directory. They can now be checked into source control like any other project item.

The final step is to add the “libs” path from your solution to the search path for ExtensionSDKs in your project file. Right-click the project in the Solution Explorer and click Unload Project:
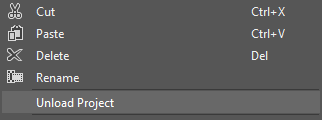
image_16

Now you can right-click the project again and select Edit Project File. This will bring up the csproj (or vbproj) file up in the XML editor. Scroll to the bottom of the file and you’ll see a line starting with “<Import Project=…”. On the next line, add the following XML:

<PropertyGroup>
  <SDKReferenceDirectoryRoot>$(SolutionDir)\libs;$(SDKReferenceDirectoryRoot)</SDKReferenceDirectoryRoot>
</PropertyGroup>


That will tell Visual Studio and MSBuild to look for additional Extension SDKs in your libs directory before checking the default locations.

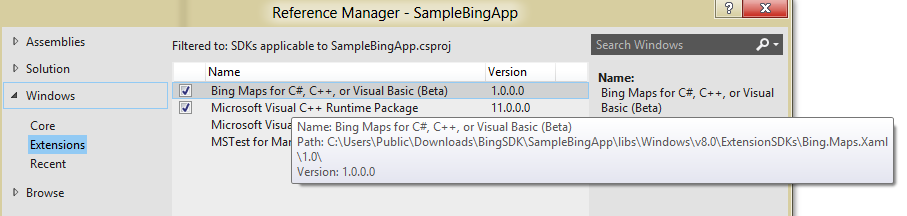
Save your changes and then reload the project file by right-clicking the project in the Solution Explorer and clicking Reload Project. If you check the properties for the reference, as before, you’ll now see it resolving to your project path instead of your user profile:

You’re now ready to check your changes in and share them with others. Build systems and other users of your code won’t need to install the extensions as they’ll be using the version alongside your project.

One additional thing to note is that after modifying your project file to include your libs directory, Visual Studio’s Add Reference dialog will automatically pick up any Extension SDKs that reside there:
Happy coding!

Reflections on Reflection

March 11, 2012 Coding No comments , ,

The Reflection API in .NET 4.5 received an overhaul. It’s easy to miss at first glance as for backwards-compatibility reasons, when you’re targeting .NET 4.5, you’ll still see all of the properties and methods on the Type and Attribute-related classes that you’ve used for years. The easiest way to see the extent of the redesign is to create a new Metro-style application or class library and look at the available properties there (or just use the Object Browser.) When you look at Type, you’ll immediately notice that most of the methods you’ve used in the past are missing – like GetProperties or GetMethods. If you look around, you’ll also see that a frequently-used enum, BindingFlags, has been completely removed.

All of the functionality is still present but has been refactored into two main areas, TypeInfo and a set of extension methods. First, to get access to TypeInfo and its related extension methods, you do need to have a “using System.Reflection”. That adds a GetTypeInfo method to Type and a series of Attribute related ones to PropertyInfo’s, MemberInfo’s, etc. The TypeInfo object provides access to methods, properties, fields, etc., that are declared on the type itself (but not on base classes). It’s the same as using BindingFlags.Public | BindingFlags.NonPublic | BindingFlags.Instance | BindingFlags.Static | BindingFlags.DeclaredOnly in the older API’s. If you want to have behavior similar to the older GetMethods/GetProperties-type calls, that’s where the RuntimeExtensions methods come in. To use these, you need to add a “using System.Reflection.RuntimeExtensions”. After that, you’ll get access to a series of methods, GetRuntime* that extend Type instances. For the most part, it’s doing the same thing as the original methods, but without letting you specify the binding flags – instead, it uses BindingFlags.NonPublic | BindingFlags.Public | BindingFlags.Static | BindingFlags.Instance. It’s up to you to filter out the results if you only want a subset, like instance methods, public, etc. Fortunately, Linq makes this really easy by adding a .Where(…) to the result of the calls.

For the most part, if you’re porting existing code from .NET to Metro, you’ll want to use the GetRuntime* methods as those are the closest to the older ones. You’ll then need to consider the binding flags you were using and add the appropriate Where clause at the end.

Happy reflecting!